


Hey everybody, I'm gonna show you How to make armor with Pepakura.
What is Pepakura?
It's papercraft with a silly name.
What you WILL need
A 3d Model of your Armor
This is CRUCIAL! If you Don't have one then this method will NOT work for you, unless you are good at making paper models by eye. Try and get a model made by someone!
Pepakura DESIGNER
The program you need to print your papercraft, works with all windows and linux versions.
If you are a Mac use you are shit out of luck. Have fun playing portal with a one click mouse.
Dwonload Pep Designer HERE
Also be sure to check out my "Pepakura Designer and YOU" thread (coming soon )
)
Card stock paper
A thick paper, available in Letter and A4 sizes. 110 lb is Ideal for armor building, But 65 lb will work too.
Exacto Knife
For cutting out the shapes, any will do.
2 Temp Hot glue gun
Trust me, this is by far the best glue for Pepakura.
Pens
2 different colored pens for drawing over the fold lines.
Music
Cutting out pepakura is boring as shit, you'll want music or a cool movie to keep you going.
Ruler or Tape measure
For scaling measuring, and making/cutting straight lines.
Fiber glass Resin
sticky smelly nasty stuff used to harden your armor piece.
around 12 bucks a can at walmart, check auto repair section, bondo brand is the best for this.
Fiberglass Mat or Cloth
For making your armors Rock hard. mat is stronger, absorbs more resin, hard to work with. cloth is easier for beginners.
Respirator
Just in case you still want your lungs to work when you're 40+
Bondo Automotive Filler
Grey goopy stuff, for detailing ans smoothing.
Disposable Gloves
Latex,Vynil, or nitrile gloves work, I prefer nitrile.
Tarp
For the ground for were ever you are resining.
Sandpaper
To sand stuff down, duh.
Dremel
An invaluable tool to have for armor making. Make sure you buy the Cutting tool for it (It looks like a little buzz saw)
Paint
Acrylic or spray
Spot putty
For filling pin holes
Okay! Now that you know what you need, lets get on to the tutorial!
STEP 1: Pick your armor model
For this to work you need a 3d model of your character's armor. If you do Then Check out my "Pepakura Designer and YOU" thread (Coming soon) and TK6189's Scaling Thread
If you do not, Try and get it commissioned, Rip it from a game or make it yourself in a 3d editing program.
For me I'll be making Kamen Rider Kuuga's mighty form Chest piece.
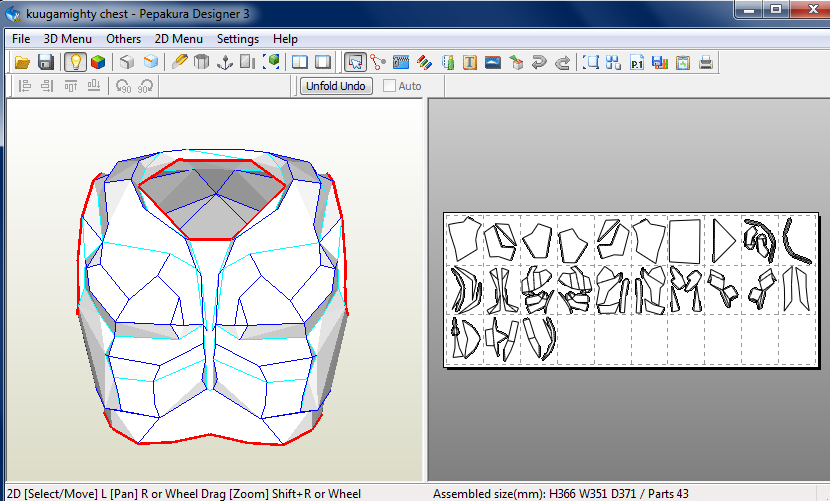
Make sure you scale your armor to fit you. To scale your armor go to 2D Menu --> Change Scale--> Scale Factor... and insert the HEIGHT the program will do the rest. Rearange the parts to fit the pages and Print on your cardstock!
STEP 2: Cutting and Assembly
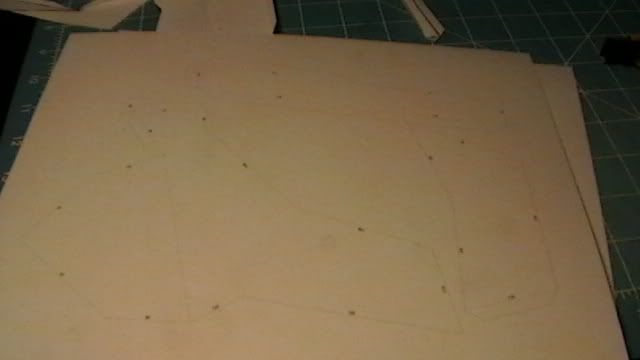
First thing I do with a page is use a pen and draw a line over the fold lines, blue or black for mountain folds (---------)
and red or purple for valley folds(_._._._)
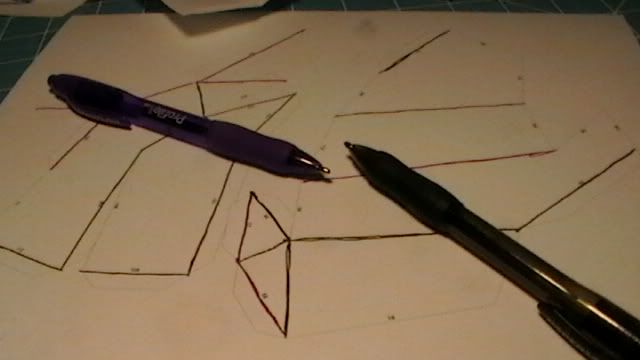
Make sure to apply pressure while drawing the line and try and keep it straight, It helps to make crisp clean folds. using a ruler would help.
Carefully cut out and FOLD!
You should now have a piece like this...
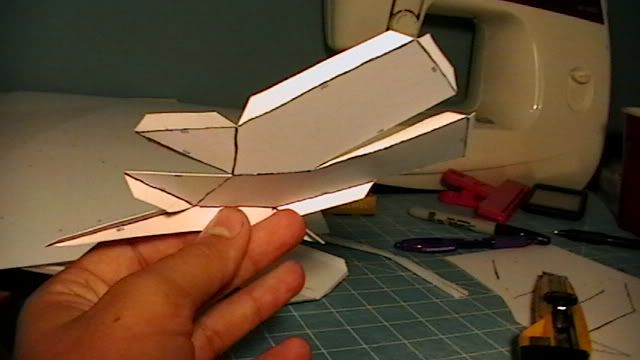
Now do that with all the pieces!
Done cutting it out? cool. took forever right? yeah that happens
now let's glue them together!
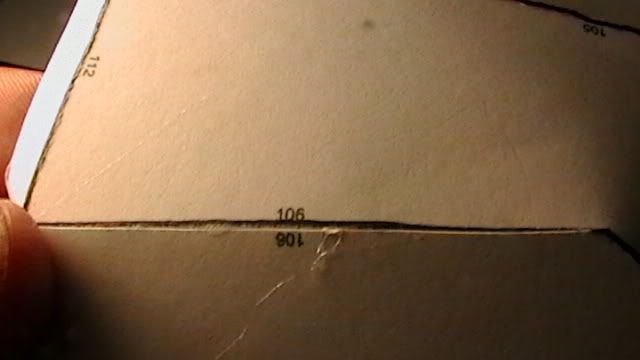
What you do its find the flap that has the number that matches the other piece with the same number. Line the numbers up and glue the flap to the other piece, like shown.

Keep going until its completed.
At the time of this posting I have not finished the part. It this tutorial is being written as I go, so please bare with me.
Also its 3:30 am and I'm gonna got o bed now, The next posts and thread will be up before the end of next week
What is Pepakura?
It's papercraft with a silly name.
What you WILL need
A 3d Model of your Armor
This is CRUCIAL! If you Don't have one then this method will NOT work for you, unless you are good at making paper models by eye. Try and get a model made by someone!
Pepakura DESIGNER
The program you need to print your papercraft, works with all windows and linux versions.
If you are a Mac use you are shit out of luck. Have fun playing portal with a one click mouse.
Dwonload Pep Designer HERE
Also be sure to check out my "Pepakura Designer and YOU" thread (coming soon
Card stock paper
A thick paper, available in Letter and A4 sizes. 110 lb is Ideal for armor building, But 65 lb will work too.
Exacto Knife
For cutting out the shapes, any will do.
2 Temp Hot glue gun
Trust me, this is by far the best glue for Pepakura.
Pens
2 different colored pens for drawing over the fold lines.
Music
Cutting out pepakura is boring as shit, you'll want music or a cool movie to keep you going.
Ruler or Tape measure
For scaling measuring, and making/cutting straight lines.
Fiber glass Resin
sticky smelly nasty stuff used to harden your armor piece.
around 12 bucks a can at walmart, check auto repair section, bondo brand is the best for this.
Fiberglass Mat or Cloth
For making your armors Rock hard. mat is stronger, absorbs more resin, hard to work with. cloth is easier for beginners.
Respirator
Just in case you still want your lungs to work when you're 40+
Bondo Automotive Filler
Grey goopy stuff, for detailing ans smoothing.
Disposable Gloves
Latex,Vynil, or nitrile gloves work, I prefer nitrile.
Tarp
For the ground for were ever you are resining.
Sandpaper
To sand stuff down, duh.
Dremel
An invaluable tool to have for armor making. Make sure you buy the Cutting tool for it (It looks like a little buzz saw)
Paint
Acrylic or spray
Spot putty
For filling pin holes
Okay! Now that you know what you need, lets get on to the tutorial!
STEP 1: Pick your armor model
For this to work you need a 3d model of your character's armor. If you do Then Check out my "Pepakura Designer and YOU" thread (Coming soon) and TK6189's Scaling Thread
If you do not, Try and get it commissioned, Rip it from a game or make it yourself in a 3d editing program.
For me I'll be making Kamen Rider Kuuga's mighty form Chest piece.
Make sure you scale your armor to fit you. To scale your armor go to 2D Menu --> Change Scale--> Scale Factor... and insert the HEIGHT the program will do the rest. Rearange the parts to fit the pages and Print on your cardstock!
STEP 2: Cutting and Assembly
First thing I do with a page is use a pen and draw a line over the fold lines, blue or black for mountain folds (---------)
and red or purple for valley folds(_._._._)
Make sure to apply pressure while drawing the line and try and keep it straight, It helps to make crisp clean folds. using a ruler would help.
Carefully cut out and FOLD!
You should now have a piece like this...
Now do that with all the pieces!
Done cutting it out? cool. took forever right? yeah that happens
now let's glue them together!
What you do its find the flap that has the number that matches the other piece with the same number. Line the numbers up and glue the flap to the other piece, like shown.
Keep going until its completed.
At the time of this posting I have not finished the part. It this tutorial is being written as I go, so please bare with me.
Also its 3:30 am and I'm gonna got o bed now, The next posts and thread will be up before the end of next week
Last edited by Decade on Sun Oct 10, 2010 10:47 pm; edited 1 time in total
